A 2-car garage with workshop space solves a real problem: storing vehicles while having room to actually build, repair, and tinker without cramped conditions. Whether someone plans to restore a truck, set up a woodworking station, or simply create a dedicated hobby area, combining these functions demands thoughtful planning. The difference between a cluttered, barely functional space and a well-organized garage-workshop comes down to intentional design, understanding how to divide square footage, manage air quality, route power efficiently, and keep tools accessible without overrunning parking. This guide walks through the essentials: space planning, ventilation, flooring, storage, and utilities that make a dual-purpose garage actually work in practice.
Table of Contents
ToggleKey Takeaways
- A 2-car garage with workshop space eliminates cramped conditions by combining vehicle storage with dedicated work areas, allowing vehicles to stay protected while enabling permanent tool setup and project organization.
- Effective space planning starts with drawing a scale layout that reserves roughly 160 square feet for parking and allocates the remaining 240+ square feet to segmented work zones (heavy work, assembly/finishing, and storage) to maximize functionality.
- Proper ventilation with a 2–3 HP exhaust fan, intake louvers, and dust collection systems is essential for managing fumes, dust, and corrosion when working with paint, stain, solvents, or power tools in your garage-workshop.
- Sealed concrete with epoxy or polyurethane coating, combined with interlocking floor tiles in the work zone, provides durability, safety, and comfort while protecting against oil, spills, and staining in a high-use space.
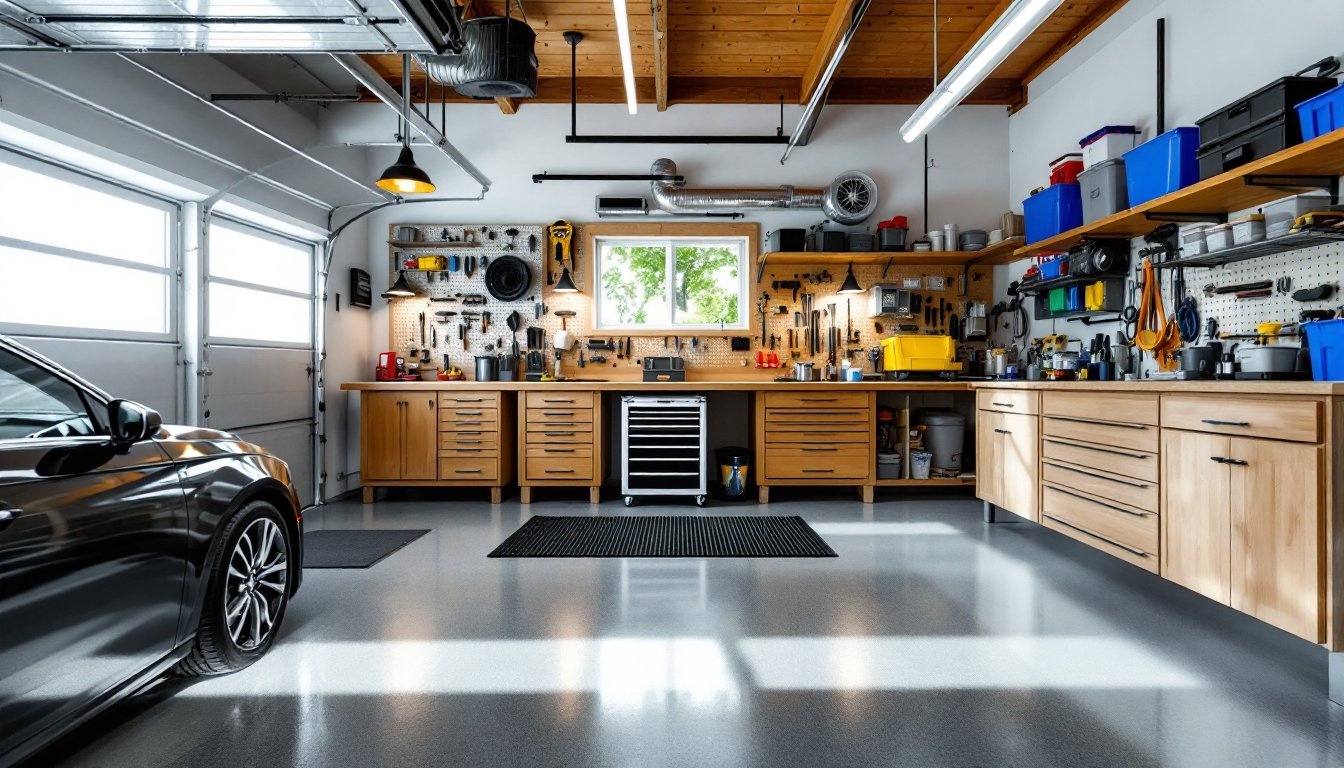
- Vertical wall storage—including pegboards, shelving, cabinets, and workbenches—keeps tools visible and accessible at waist height while protecting hazardous materials and preventing clutter from overrunning the parking zone.
- Layered lighting with overhead LED fixtures (4000–5000K color temperature), task lighting above work surfaces, and dedicated electrical circuits with GFCI protection ensure accuracy, safety, and efficient tool operation throughout the garage-workshop.
Why A Combined Garage-Workshop Matters
A dedicated workshop separate from vehicle storage is luxury. Most homeowners work with what they have, and combining these functions makes sense economically and practically. A properly planned 2-car garage with workshop space eliminates the excuse of “no room to work.” The vehicle can stay protected from weather while the owner has a permanent setup for tools, projects, and materials without tearing down and rebuilding every time.
This hybrid approach also improves safety and efficiency. Vehicles parked indoors stay dry, reducing rust and extending life. Tools stay organized on permanent walls rather than scattered in boxes. Work surfaces don’t double as storage. The owner knows exactly where everything is, and projects flow from start to finish without constant shuffling. When planning resale value, a well-designed garage-workshop adds appeal to buyers who appreciate both automotive care and the ability to work on projects, a meaningful edge over a standard two-car space.
Space Planning Essentials For Dual Functionality
Start with real numbers. A standard 2-car garage is typically 20 feet wide by 20 feet deep. That’s 400 square feet. Two vehicles side by side need roughly 160 square feet, leaving about 240 square feet for workshop, storage, and circulation. If building new, consider expanding to 24 feet wide or adding 8 feet to the depth: these modest increases dramatically improve usability.
Draw a layout to scale. Mark parking spaces first: each car needs a minimum 9 feet wide by 18 feet long (nominal). Add 2–3 feet on each side for opening doors and moving around. Once parking is fixed, the remaining perimeter and back wall become workshop territory. Plan the work zone in the rear or against a long wall, not scattered everywhere. Grouping similar tasks (wood tools near the workbench, mechanical work near the vehicle, finishing in a dust-free corner) saves steps and keeps air quality manageable.
Creating Dedicated Work Zones
Segment the space mentally into zones: parking, heavy work (vice, drilling, grinding), assembly/finishing, and storage. A woodworking bench works best against the back wall, 4–6 feet deep, leaving passage behind it. A mechanical lift or creeper area should be away from doors and foot traffic. A finishing zone needs the cleanest air and brightest light, ideally separated by a temporary partition or at least distance from dust-generating tools.
Cycle projects through zones intentionally. Rough cutting happens in the main work area: assembly and finishing move to the cleaner zone. This workflow keeps dust and noise contained and prevents cross-contamination. Real-world: many users dedicate the front half (parking and circulation) and reserve the back half and side walls purely for work, creating a mental and physical boundary that’s easy to enforce and keeps the space from becoming a chaotic catchall.
Ventilation & Climate Control Solutions
Poor ventilation is the silent killer of garage workshops. Dust accumulates, fumes linger, and tools corrode. Mechanical ventilation is non-negotiable if any work involves dust, paint, stain, or solvents.
For a 2-car garage, start with a 2–3 HP garage exhaust fan mounted in the rear wall or soffit, ducted outside. Pair it with intake louvers on the opposite wall (front or side) to create cross-ventilation. The exhaust pull should be continuous during work, not occasional. A wall-mounted dust collector ($200–600) captures sawdust at the source from stationary tools: even a small portable unit ($100–300) beats hand-sweeping shavings. For chemical fumes (paint, stripper, solvent), boost the exhaust capacity by adding a second fan or upgrading to a 6-inch ductwork system.
Climate control keeps humidity low, protecting tools and reducing corrosion. Insulating the walls and roof (especially if the garage is unheated) helps. A dehumidifier in humid climates or a small space heater in cold ones maintains a working environment. This isn’t luxury, it’s maintenance. Rust spreads fast on unprotected metal in high humidity.
Flooring & Foundation Considerations
The garage floor endures vehicles, dropped tools, chemical spills, and hard use. A standard concrete slab (4–6 inches thick on a gravel base) is durable but cold, slippery when wet, and hard on knees during long work sessions. Properly sealed concrete with a polyurethane or epoxy topcoat resists oil, tire marks, and staining, a smart investment if the space will be work-intensive.
For comfort and safety, consider interlocking PVC floor tiles or rubber mats over concrete in the work zone. These cost more upfront ($2–5 per square foot) but provide cushioning, improve grip, and define the workshop area visually. Isolate spill-prone zones with a berm or trench to contain fluid runoff, especially where vehicles park or oils might leak.
If building new, ensure the slab is properly sloped (minimum 1% grade) toward a drain or sump to prevent water pooling. Check local codes: some jurisdictions require a basement or floor protection measures for construction near water tables. A slight slope also makes cleaning easier. Avoid thin, brittle sealers: invest in 2-part epoxy rated for automotive and workshop use, it lasts 5–10 years with minimal maintenance.
Storage & Organization Systems That Maximize Your Space
Storage makes or breaks a functional workshop. Without it, tools migrate into the parking zone and projects spill everywhere. Wall space is prime real estate.
Install 16-inch on-center studs with heavy-duty wall bracing to support shelving, pegboards, and cabinets. A pegboard wall ($50–150) stores hand tools, cords, and small items efficiently and keeps them visible. Above-head storage racks or ceiling shelves (using lag bolts rated for garage load, typically 50 lbs per bolt) store seasonal items, materials, and overflow.
Solid workbenches with drawers and shelving underneath ($300–1000+) anchor the work zone and provide immediate tool access. A rolling tool cart ($150–400) bridges the gap between bench and vehicle work, tools come to the job, not vice versa. Magnetic strips on vertical surfaces grab metal tools: small plastic bins on labeled shelves organize fasteners, finishing supplies, and hardware by type and size.
Vertical storage rules: use wall space before floor space, keep frequently used items at waist height, and store heavy items low. A wall-mounted cabinet for hazardous materials (paint, solvent, stripper) keeps them secured, contained, and out of a child’s or pet’s reach, a legal and safety requirement in most areas.
Lighting, Power, & Utility Requirements
Poor lighting kills accuracy and creates safety hazards. A single overhead fixture isn’t enough for detail work.
Layered lighting works best: overhead LED shop fixtures (providing 4000–5000K color temperature for accurate color) as baseline, supplemented by task lighting directly above work surfaces. LED panels or strip lights along benches ($1–3 per foot) eliminate shadows where hand tools are used. Headlamp flashlights ($20–50) are invaluable for under-vehicle work or deep tool drawers.
Electrical: plan for dedicated circuits. A standard garage runs on 100–200 amp service: ensure workshop circuits are separate from parking zone circuits to avoid tripping breakers mid-task. Install 20-amp circuits for tool use with GFCI protection (required by code in wet areas and for portable tools in garages). Outlets should be spaced no more than 6 feet apart along work walls, with a few high-capacity receptacles for air compressors or large stationary tools. Compressed air lines, water supply for cleaning, and a drain (even a simple floor drain) are luxuries that dramatically improve workflow. Check local electrical codes, permitting is often required for sub-panels or significant upgrades.