A garage workshop is more than a place to store tools, it’s the command center for DIY projects, repairs, and creative builds. Whether someone’s tackling furniture restoration, woodworking, automotive maintenance, or general home repairs, a well-organized garage workshop transforms a cluttered space into a functional hub. The difference between a frustrating project and a satisfying one often comes down to having the right setup: proper lighting, accessible storage, a solid work surface, and good ventilation. In 2026, DIY garage workshop ideas focus on maximizing limited square footage, improving workflow, and creating an environment where projects flow smoothly. This guide covers practical, budget-conscious strategies to build a workshop that actually works.
Table of Contents
ToggleKey Takeaways
- Plan your garage workshop layout in three zones—staging area, work zone, and storage—to maximize workflow and keep the floor clear for maneuvering materials.
- A basic DIY workbench made from 2×4 framing and plywood costs $150–250 and provides the solid, flat work surface essential for project accuracy.
- Install 50–75 foot-candles of overhead LED shop lighting plus task lighting above the workbench to eliminate shadows and improve safety on detailed work.
- Organize tools by category with items stored at eye level for frequent use, heavy tools on lower shelves, and fasteners in labeled compartments for quick access.
- Wall-mounted pegboards, shelving, and magnetic strips offer flexible, budget-conscious storage that keeps tools visible and accessible without consuming valuable workspace.
- Proper ventilation through exhaust fans or dust collectors prevents dust buildup and clears fumes from finishing work, protecting both your health and workshop tools.
Plan Your Layout and Storage Solutions
Before buying a single shelf or pegboard, walk through the garage and think about how a project actually moves through the space. Most workshops need three zones: a entry/staging area for incoming materials, a work zone (bench, tools, in-process projects), and a storage area (tools, fasteners, supplies). Measure the garage width and depth, note where electrical outlets and windows are, and identify any structural obstacles (posts, HVAC ducts, water heaters).
Start by sketching the layout on paper or using a simple CAD tool. Leave at least 2-3 feet of clear floor space for moving sheet goods like plywood or drywall, it sounds obvious until someone tries to maneuver a 4×8 sheet in a cramped corner. If the garage doubles as a vehicle space (the reality for many), plan tool storage against walls and keep the center floor clear.
Storage doesn’t have to be fancy. Wall-mounted cabinets, shelving units, and hooks are far cheaper and more flexible than floor cabinets that consume valuable workspace. Calculate rough storage volume before committing: a typical homeowner accumulates 400–600 hand tools and fasteners, plus project-specific materials. Plan accordingly, underbuy storage, and the space stays chaotic: overbuy, and you’ve wasted money on half-empty shelves.
Build Essential Workbenches and Work Surfaces
A solid, flat work surface is non-negotiable. It’s where accuracy lives. A proper workbench needn’t be expensive or complicated, most DIYers start with a simple table made from 2×4 framing and a 3/4-inch plywood top, standing 30–36 inches tall (standard bench height). The depth should be at least 24 inches, and the length 4–6 feet depending on available space.
For a dedicated bench, consider adding a lower shelf for storing clamping tools, chisels, or project materials. If space is tight, a fold-up or mobile workbench can work, just ensure it’s rock-solid when deployed and won’t wobble under load. Wobbling = wasted time and mistakes.
A secondary work surface, even a sheet of plywood laid across sawhorses, handles assembly, finishing, or large project layout. Dedicated finishing space keeps dust off the main bench and separates wet projects from sharp-tool work.
Simple Workbench Designs for Beginners
The simplest buildable workbench uses a 2×4 frame (16 inches on center) supporting a 3/4-inch plywood top. Here’s the essentials:
- Cut four 2×4 legs to 32–34 inches (accounting for caster height or floor irregularities).
- Build two end frames using 2×4 cross-braces, fastening with 2.5-inch pocket hole screws or bolts.
- Connect the end frames with side rails: add a middle support beam if the bench is over 5 feet long to prevent sagging.
- Screw the plywood top down with 1.25-inch screws every 12 inches.
- Optional: Add a 0.75-inch hardboard or MDF facing on top for durability: replace it when it’s beat up.
Total cost: $150–250 depending on wood grade and hardware. A laminate countertop offcut also makes a durable top and costs less than premium plywood. Avoid veneered particleboard, it won’t handle clamping pressure or repeated fastening.
For a mobile bench, mount the frame on four locking casters rated for at least 500 pounds total. Locking wheels are essential, no one wants a workbench rolling across the garage mid-project.
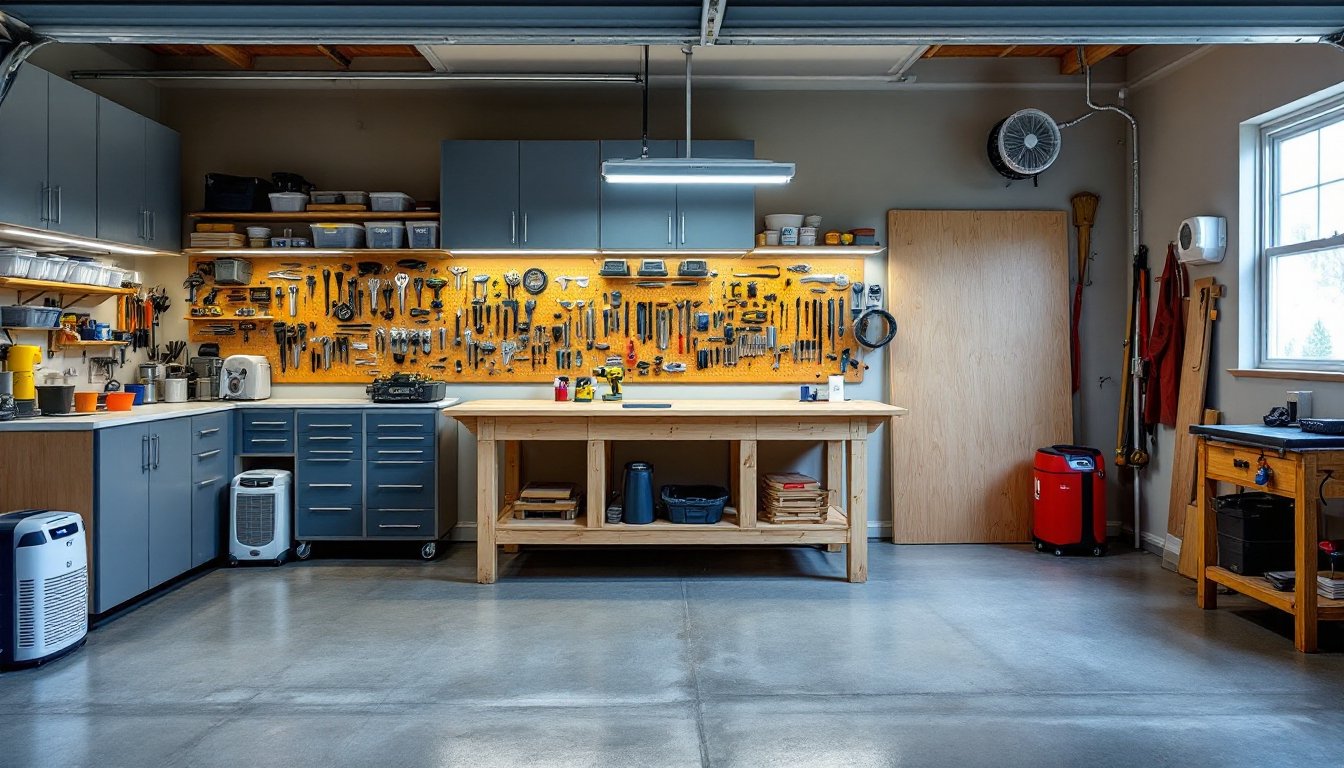
Install Proper Lighting and Ventilation
Poor lighting is a joy-killer. Details matter in woodworking, electrical work, and repairs, and shadows or glare introduce errors and safety risks. Overhead shop lighting should provide 50–75 foot-candles of illumination across the main work area. A pair of 4-foot LED shop lights (5000K color temperature) hung 7–8 feet high covers a typical 2-car bay and costs $60–100 total. LED is non-negotiable: it’s cool, lasts 25,000+ hours, and doesn’t waste energy as heat.
Add task lighting above the main workbench, a 24-inch LED strip or articulating work light ($20–50) eliminates shadows on detailed work. Position it in front of, not behind, the work area to avoid casting shadows.
Ventilation prevents dust buildup and clears fumes from finishing, epoxy, or solvent work. A single shop-grade exhaust fan (800–1200 CFM) in a garage door opening or window works well and costs $100–200. For serious finishing work (painting, staining), a dust collector or cartridge filter system is worth the investment: portable units run $150–400. If budget is tight, a simple box fan in a window with a filter taped to the intake moves air and captures dust, crude but effective.
Ensure the garage has at least one floor drain or good drainage path if water will be present (rinsing tools, vehicle washing). Moisture + metal tools + concrete = rust and corrosion. Dehumidifiers help in humid climates: a small portable unit costs $150–300 and pays dividends in tool preservation.
Organize Tools and Materials Efficiently
A disorganized tool collection wastes hours hunting for that specific wrench or bit. The key is visibility and access: tools should be grabable without moving five other things.
Sort by category: hand tools, power tools, fasteners, safety gear, project-specific supplies (wood, hardware, finishes), and seasonal items. Hand tools near the workbench: heavy tools on lower shelves: frequently used items at eye level. Fasteners belong in small drawers or labeled bins, a clear plastic organizer with 40 compartments ($15–25) beats dumping mixed screws in a toolbox every time.
Label everything. A label maker or masking tape + marker feels tedious until someone returns to the workshop three months later and knows exactly where things live. This alone cuts project setup time in half.
For power tools, wall-mounted hooks or pegboard strips keep them visible and protected. A corded tool hanging from a hook is instantly available: buried in a cabinet, it’s out of sight and out of mind. Battery-powered tools deserve a dedicated charging station on the wall, a simple shelf with outlet strips manages chargers without mess.
Wall-Mounted Storage and Pegboards
A pegboard is the workshop workhorse. Affordable, flexible, and easy to reconfigure, a 4×8 pegboard ($40–60) with hooks and bins ($50–100 total) organizes an enormous amount. Here’s the setup:
- Mount the pegboard on 0.75-inch spacers (furring strips or washers under each hole) so hooks slide in and out freely.
- Anchor it to wall studs with 0.25-inch bolts every 16 inches: pegboard alone can’t hold tool weight.
- Group related tools: wrenches together, screwdrivers in one section, sanders below, chisels in a dedicated row.
- Use magnetic strips for chisels, plane blades, and other metal hand tools: keeps edges sharp and visible.
- Add wall-mounted shelving above or beside the pegboard for larger items: drill press, compressor, storage bins.
Alternative: French cleats (interlocking 45-degree strips of plywood screwed to the wall and tool holders) let cabinets and shelves hang securely and adjust without drilling new holes. A pair of French cleats costs $10–20 in materials and can hang several hundred pounds.
Always identify wall studs with a stud finder before mounting heavy storage. Drywall anchors alone won’t support a loaded cabinet: fasteners must reach the framing.
Conclusion
A functional garage workshop doesn’t require a large budget or a perfect space. The priority is layout (zone the space thoughtfully), a solid work surface, adequate lighting, and organized tool storage. Start with the essentials, a simple workbench, basic shelving, and proper lighting, and expand as needs become clear. Most workshops evolve over years, not weeks. The projects that come through will reveal what’s missing. Build smart, stay safe, and enjoy the space that makes DIY actually enjoyable.