A Milwaukee grease gun that won’t dispense smoothly, leaks at the seams, or refuses to prime is a frustrating dead weight in any toolbox. Whether you’re maintaining agricultural equipment, fleet vehicles, or shop machinery, a reliable grease gun is essential. The good news: most performance issues stem from worn seals, clogged nozzles, or damaged pump components, all fixable with the right replacement parts. Understanding which components fail first and how to source compatible Milwaukee parts saves money and downtime. This guide breaks down the anatomy of a Milwaukee grease gun, identifies critical wear parts, and shows exactly how to find the right replacements for your specific model.
Table of Contents
ToggleKey Takeaways
- Most Milwaukee grease gun performance issues—including leaks, poor dispensing, and priming problems—stem from worn seals, clogged nozzles, or damaged pump components that are easily replaceable.
- Seals and gaskets are critical wear parts; preventive replacement every 3–4 years of heavy use costs $15–$40 and prevents costly downtime, while regular maintenance extends tool life significantly.
- Always identify your exact Milwaukee grease gun model number before purchasing replacement parts, as components between hand-pump cartridge guns and bulk-fill pneumatic models are not interchangeable.
- Stick with Milwaukee-branded seals and parts from authorized distributors rather than generic aftermarket alternatives, which may swell unpredictably or fit loosely in certain grease types.
- Simple maintenance habits—wiping clean after use, proper plunger storage, using the correct coupler size, and flushing the outlet port monthly—cut seal wear time by half and prevent common failure points.
- If your grease gun won’t prime, try disconnecting the coupler and pumping slowly; if grease flows easily, the coupler is clogged, but internal resistance indicates the inlet check valve may be stuck and needs penetrating oil.
Understanding Milwaukee Grease Gun Components
Pump and Trigger Mechanism
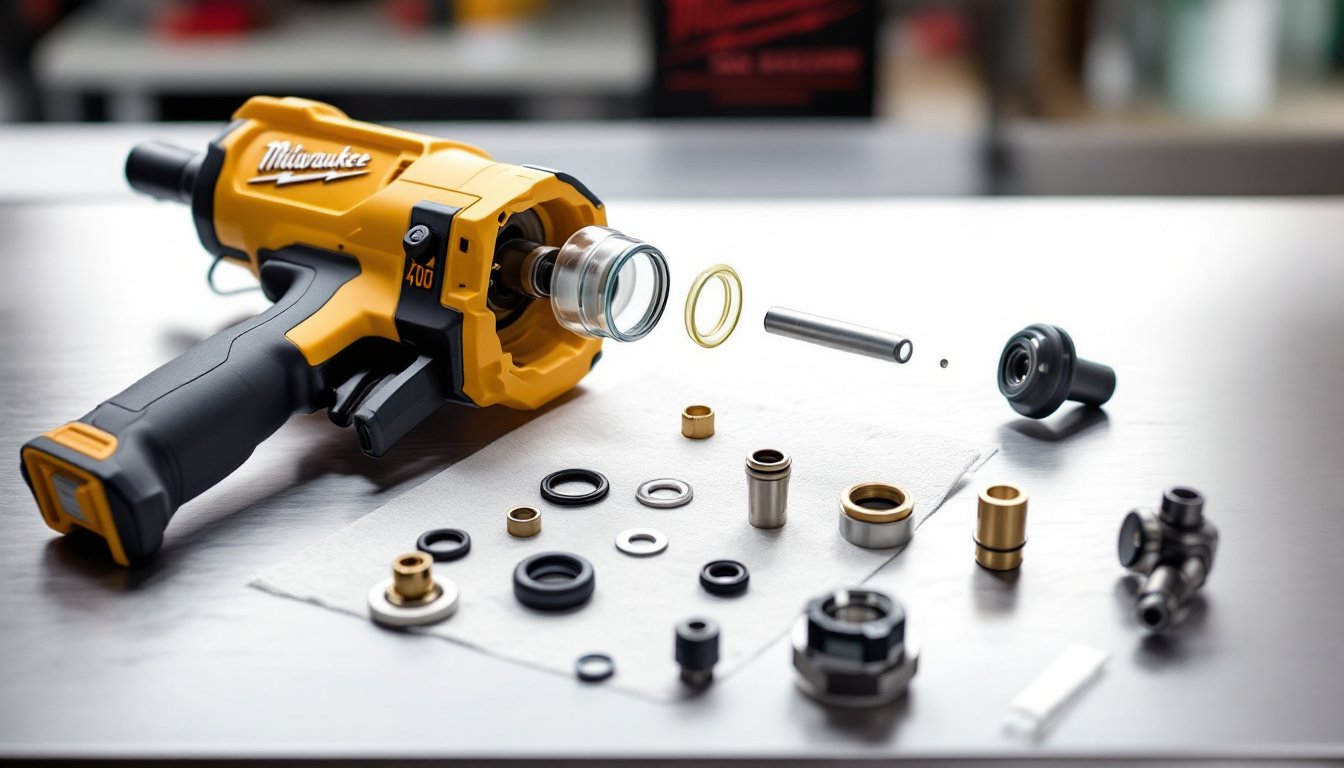
A Milwaukee grease gun’s pump is the heart of the tool. It consists of a plunger rod, a pressure chamber, and a trigger linkage that forces grease forward with each squeeze. The plunger rod slides inside the cylinder and is sealed with primary and secondary seals (more on those later). When you pull the trigger, a mechanical link compresses the plunger, building pressure in the chamber. This pressure forces grease through the delivery outlet.
The trigger itself is a simple lever mechanism, but it’s where repetitive stress happens. Over time, pivot pins can loosen or wear, making the trigger mushy or difficult to operate. Milwaukee’s design typically uses a ball-bearing pivot point that resists wear better than simple pin joints, but it’s still serviceable. If your trigger feels like it’s grinding or has excessive play before it grips, the internal linkage may need adjustment or replacement of the pivot assembly.
Proper maintenance here is preventive: clean grease buildup around the trigger regularly, and if the mechanism starts sticking, don’t force it, that’s usually a sign the seals inside the pump are failing and grease has migrated where it shouldn’t be.
Fluid Delivery System
Once grease is pressurized by the pump, it travels through the fluid delivery path: a tube or channel that runs from the pressure chamber to the outlet port. This is where the coupler and nozzle attach. Milwaukee grease guns typically use one of two coupler types: a pneumatic-style push-on coupler (common on bulk-fill models) or a cartridge-style coupler (on caulk-gun-style 400g units).
The delivery tube itself is usually brass or steel and rarely fails unless corroded or bent. The real wear points are where tubes connect to the outlet fitting. Small cracks or loose fittings here create leaks that weep grease and reduce pressure. If you notice grease pooling around the outlet, tighten the fitting first with a wrench, don’t overtighten, or you’ll strip the threads.
The nozzle and coupler assembly is the last part grease contacts before reaching the bearing. Nozzles are replaceable and come in different lengths and styles. A clogged nozzle is one of the most common complaints, but it’s also the cheapest fix: soak it in a cleaner or replace it with a fresh one.
Essential Replacement Parts and When to Replace Them
Seals and Gaskets
Seals are the silent workhorses that keep pressure inside and contaminants out. A Milwaukee grease gun typically has three to five seals, depending on the model. The primary piston seal (usually a rubber or polyurethane cup) wraps around the plunger rod and creates a pressure-tight fit inside the cylinder. When this seal wears, grease leaks past the plunger rod when you pump, and pressure drops, you’ll feel it as a soft, unresponsive trigger.
Below the primary seal is often a secondary backup seal, which prevents total failure if the primary fails. Both seals face abrasive grease particles over thousands of pump cycles. Modern Milwaukee seals are rated for extended life, but once they begin to fail, replacement is the only real fix. Attempting to scrape and reseal them rarely works: you’ll need the seal kit specific to your model.
The outlet port gasket prevents leaks where the delivery tube meets the body. This is a thin rubber or felt washer that’s easily replaced, it’s often the first seal to show signs of wear as grease works past it under pressure. If you see grease weeping from the outlet connection even with the coupler removed, a new outlet gasket usually solves it for under $5.
When to replace: If your grease gun has more than 5 years of regular use or won’t build pressure consistently, seals are the prime suspect. Many users wait until they notice leaks, but preventive replacement every 3–4 years of heavy use is smart insurance. A seal kit for Milwaukee models runs $15–$40 depending on which seals are included.
Note: Seal replacement requires disassembly of the pump cylinder. If you’re not comfortable working with small parts and reassembly, a professional tool repair shop can do it for around $60–$100 in labor.
Finding Compatible Parts for Your Milwaukee Model
Milwaukee makes several grease gun styles, and parts aren’t always interchangeable. The two main categories are manual hand-pump grease guns (popular 400g cartridge-style units and bulk-fill barrel pumps) and electric or pneumatic-powered models (which have more complex drive systems).
Finding the right parts starts with your model number. It’s stamped on the barrel or pump body, usually near the trigger or pump head. Write it down or snap a photo before shopping. Milwaukee’s parts diagrams (available through authorized dealers or online) break down every component with a part number. This is critical: a seal kit for a 400g hand gun won’t fit a barrel pump, and vice versa.
For hand-pump 400g cartridge guns (the yellow and black units most DIYers recognize), parts are widely available through Milwaukee distributors, home improvement stores, and online retailers. Replacement coupler bodies, plunger rods, and seal kits are standard stock items.
Bulk-fill models (used for larger lubrication jobs) are trickier. These run on air (pneumatic) or electric motors. If you own one, you’ll need parts through industrial suppliers or directly from Milwaukee. Call their tool support line with your model number: they’ll confirm compatibility and source the right kits.
A word of caution: aftermarket or generic “universal” seal kits exist, but they’re risky. They may fit loosely or swell unpredictably in certain grease types, causing more problems. Stick with Milwaukee-branded seals or equivalents sourced through authorized distributors, they’re not much pricier than knockoffs, and you’ll avoid comebacks.
Online, start with the Milwaukee Tool official parts website or call 1-800-SAWDUST for dealer referrals in your area. Local distributors often have stock and can cross-reference part numbers same-day.
Maintenance Tips to Extend Your Grease Gun Life
The best parts replacement is the one you never need. Smart maintenance keeps Milwaukee grease guns working for decades.
Keep it clean. After each use, wipe the exterior and trigger area with a dry cloth. Grease collects dust, and over time, it hardens into a gritty paste that works its way into seals and pivot points. Once a month, if you use the gun regularly, flush the outlet port by pumping a small amount of solvent or light oil through it. This clears any hardened grease or salt deposits that clog nozzles.
Store it properly. Don’t leave a grease gun with the plunger fully extended for weeks on end. The seal will wear unevenly. Return the plunger to its resting position when you’re done, or pump a small amount of fresh grease through to cycle the seal.
Use the right coupler. A loose coupler that slips off under pressure causes splashing and leaks, and frustration. Make sure the coupler matches your grease gun’s outlet size (typically 1/8″ or 1/4″ NPT). A coupler that’s too large will leak: one that’s too small won’t seat properly. Test the fit before you’re three stories up on scaffolding.
Watch grease type. Different applications call for different grease viscosity and additives. Extreme-pressure grease (EP grease) used in differentials is thicker and puts more stress on seals than general-purpose chassis grease. If you’re switching grease types, flush the gun with a compatible light oil to avoid seal damage from incompatible additives.
Pressure buildup problems? Before you assume internal seal failure, try this: disconnect the coupler and pump slowly. If grease flows easily, the coupler is clogged. Clean or replace it. If resistance is in the gun itself and it won’t prime, the main inlet ball (a one-way check valve inside the pump chamber) may be stuck. A few drops of penetrating oil around the inlet, followed by gentle tapping and slow pumping, often frees it without disassembly.
These small habits, cleanliness, proper storage, and mindful use, cut seal wear time by half.